A complete beginner’s guide to crochet
Learn to Crochet
Hello and a very warm welcome to my guide to crochet. I am Fiona from Flo’s Crafty Crochet. My passion is all things crochet, whether that is pattern designing or teaching, I love the mindfulness it brings and love to bring this to others. I am from Ireland and am lucky enough to live both near the mountains and the sea and use this when I am in need of inspiration.
Crochet has been around for quite some time. Its exact origins remain unknown but can be seen in every country in the world from Arabia to Ireland. The word itself comes from both France (croche) and Germany (croc – meaning hook). It was used in French lace making and later became a very important part of the Irish culture in famine times making the world-famous Irish lace. It is a widely held belief that Queen Victoria crocheted in order to ease her grief.
Wherever it came from there can be little doubt in its powerful mindful qualities. The ability to focus on the act of creation and become lost in the warmth and soothing rhythm of the craft is something very special.
As with all things, beginning is so often the hardest step. So, I am not going to tell you that it is easy, but I will promise you that it gets easier and more enjoyable the more you do it.
It is the constant repetition of the stitches that makes you comfortable with the craft. Giving just this time over the next few weeks will guarantee that in a few months’ time, you will be able to sit with your favourite TV show, relax and unwind while not even concentrating on the item you are making. Truly making mindful crochet that boosts both your mental wellbeing and your sense of accomplishment.
Let’s get to it!
Sharing is caring, lets spread the word
This guide is FREE to view on my webpage or alternatively you can buy the pretty, printable,Why should I buy the PDF version?
This is a question that I get asked A LOT. So I will try my best to let you know why I think the PDF trumps the web version.
-
Printable. Easy to manage and print out so you can take with you anywhere.
-
No ads anywhere.
-
It is pretty. I do spend a little time trying to get it to look just right so that not only do you have the functional pattern but it’s nice to look at also.
-
Photo tutorials for tricky elements
-
You get both US and UK terminology.
-
It supports me and enables me to continue to create content for you to enjoy.
Click the button below to buy your own copy now. It’s just $3 USD or £2.50 GBP!

But I really don’t want to buy the PDF version.
That’s ok, I totally understand and best of all, you don’t have to. You can still make the whole blanket from the free version of the pattern on my website!
I don’t want to buy anything BUT I want to support you, is that possible?
Yes! Very much so and I am very much grateful for this. You can share the website with your crochet friends. Share your makes on Facebook Groups and on Instagram and mention me. Word of mouth is the very best way to help support me and get the Flo’s Crafty Crochet name out there.
Where can I buy the PDF?
You can buy the PDF here on my own site but also on:-
Raverly and Etsy
You can also keep up to date with everything that is going on in Flo’s Crafty Crochet’s world by following Flo’s Crafty Crochet on Facebook. You can also join my dedicated group on Facebook. It is a great group to come and share your makes or ask any questions you may have.

Thank you as always for supporting me every step of the way.
Which hook and what yarn?
Choosing a hook can be a challenge as there are so many out there. They also vary greatly in prices. Below is a selection of the most common ones. As you become more accustomed to your craft you will find the perfect hook for you. I recommend Clover Amour and find it just makes crochet easier. Which hook you choose may also depend on how you choose to hold your hook.
As a beginner you will need to know what hook size is needed and for what yarn. This can be very confusing as there are lots of new terms that you may not have come across before. Every ball of yarn comes with a standard guide to make this easier. On the back of the band will be some information.
Meterage tells you how far that ball of yarn will go and is necessary when knowing how much to buy.
Fibre content lets you know what you are working with. The most common fibres are acrylic, cotton and wool.
Other things to have in your kit
Tape measure – self explanatory
Tapestry needle – weaving in the ends to finish off
Scissors – self explanatory
Stitch Markers – I always suggest 2 types of stitch markers as they can be used to denote different things. They can mark stitches, end of rows etc. Plus they are pretty! I make and sell a range of stitch markers if you would like to look at my store. I also have hook size reminders and counters available.


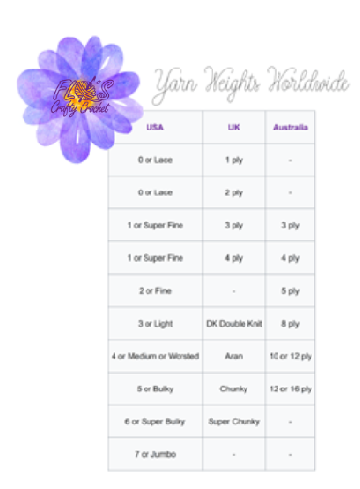
Where in the world you are determines, what name is given to yarn. With the prevalence now of Facebook these terms can easily get confused so I have included the above guide.
How to hold your hook is one of the most commonly asked questions when a new crocheter sets out on their journey. The simple answer is; in whichever way feels most comfortable for you. In the beginning all crochet feels awkward and strange, as with anything done for the first time. However, with practice it will begin to feel more comfortable and natural.
The best advice is, if it feels right, it is. I have met and taught many different styles of hook holders over the years and at the end of the day if the stitches are produced and it works for you, then it is correct.
The two most common methods for hook holding are the knife grip and the pen grip.
The Pen Grip

Pen grip
The Knife Grip

Knife grip
Tension for the stitches is then created by the other hand. This is where many people differ in how they wrap the yarn over the other hand in order to feed the yarn. Again, what works for you is always best and it can be refined and adjusted over time. Below is my method for working. Determining you will often determine which style of hook works best for you, some are designed to work with knife and some with pen.
I wrap the yarn over my index finger and capture it between my ring and little finger. It allows me to easily insert my hook and capture my yarn.

Again, this is my method, and you may find a better method for you. But this gives you a point to begin.

Prefer a printable version of my guide, click here to purchase the ad free printable guide.
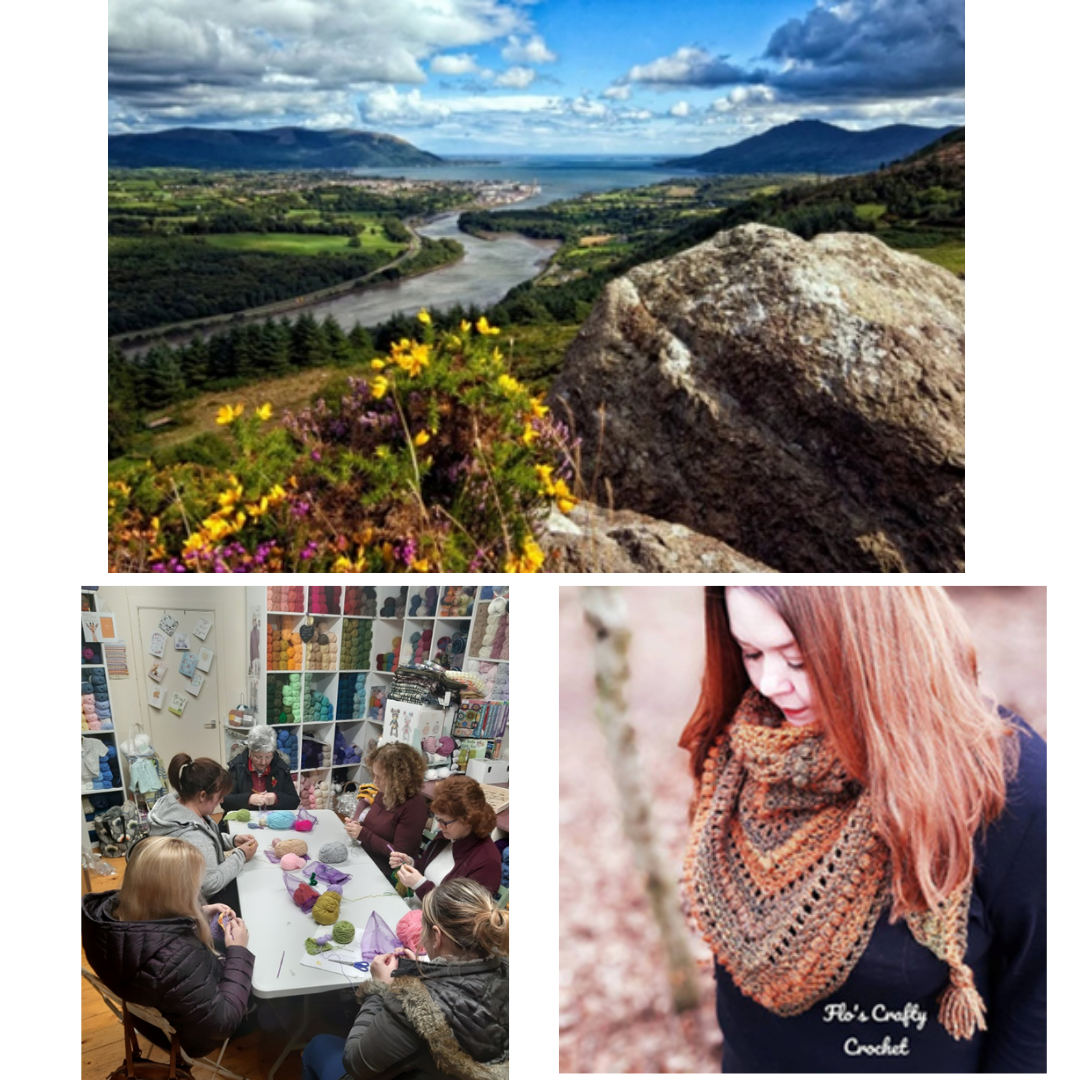
Carlingford Lough near my home taken by my husband, a crochet class I was teaching, me in my Minerva shawl

From left to right: Symphonie Wood, standard metal hook, Clover Amour, Tulip, Furls


Basic Crochet Stitch Guide
The majority of patterns are written in US crochet terms. However, from time to time you may come across UK terminology, here is a handy table for conversion.

Slip Knot
There are many methods for creating a slip knot. The method I use is to hold out 2 fingers and wrap the yarn around them like a lasso and pull the working yarn end in underneath to create a loop.

Chain Stitch
This stitch is the 1st stitch that anyone who is learning to crochet meets. It is used to begin most projects and to move between rows. It is also the tool used to create the ‘holes’ crochet is famous for.

How to chain (CH)
Yarn over hook and pull through the loop on the hook.


Some people find it easier to pull the yarn through by using their thumb and forefinger to pull the loop over the top of the work. A chain should look like a braid.
Slip stitch SL ST
Insert hook through the top of your stitch. Yarn over and pull through the yarn from behind and through the loop that is on your hook.
Slip stitches are used to move from one stitch to the next without growing the project in size. They are also used for closing off and finishing off.

Single Crochet – SC (US Terms) (DC – UK Terms)
Insert hook into the hole. (2nd CH from hook). Yarn over and pull through the hole. Yarn over again and pull through both loops on hook.

Double Crochet – DC (US Terms) (TR – UK Terms)
Yarn over and insert hook into hole (4th CH from hook) and pull the yarn through. Yarn over and pull through the first 2 loops. Yarn over pull through last two loops. The loop on the hook does not count as a stitch. We begin in the 3rd chain from the hook as the chains create the height needed for our first stitch and are counted as a stitch.

One of the most common stitches used in crochet.
Half Double Crochet – HDC (US Terms) (HTR- UK Terms)
Yarn over and insert hook into the hole (3rd CH from hook) and pull the yarn through. Yarn over and pull through all three loops on hook.
My favourite stitch as it is quick and easy.

Learning to Read Patterns
Like anything when starting out reading patterns really does seem like another language. I advise anyone learning with me to get used to the stitches first in a repetitive design like a granny square and then apply that knowledge to reading the pattern of a granny. This way you are building upon cemented knowledge, and it is easier.
Below are the most common abbreviations used.
This is not an exhaustive list; it is the most commonly used beginner terms only.
* Repeat the instructions following the single asterisk as directed
* * Repeat instructions between asterisks as many times as directed or repeat at specified locations
{ } or [ ] Work instructions within brackets as many times as directed
( ) Work instructions within parentheses as many times as directed or work a group of stitches all in the same stitch or space
You may also find it is beneficial for the first while to rewrite the pattern out in full.

Sample crochet pattern

Row 1: SC in 2nd CH from hook and each across. CH1, turn.
Rewritten in full as:-
Single crochet in the 2nd chain from the hook and each across. Chain 1, turn.
Rows 2: SC in the next 3 ST *CH2, SK2 ST, SC in the next 2ST * Rep * to * until there are 5ST left, CH2, SK2, SC in next 3. SC in last ST. CH1, turn.
Rewritten in full as:-
Single crochet in the next 3 stitches. Chain 2, skip 2 stitches, single crochet in the next 2 stitches.
Repeat Chain 2, skip 2 stitches, single crochet in the next 2 stitches until there are 5 stitches left. Then chain 2, skip 2, single crochet in 3 stitches. Single crochet in the last stitch. Chain 1, turn.
Writing out underneath the printed pattern will help you see where the connections are. And as with everything. Practice makes perfect. The more you try to read the better at it you will become.
Copyright of Fiona Campbell, Flo’s Crafty Crochet. Original pattern made by Fiona Campbell. This pattern is made for personal use only. You may not distribute, reproduce, publish, translate, alter or resell this pattern in any way or form. You may sell the finished product. Please credit Flo’s Crafty Crochet in all promotions of your work. For more information visit click here
Finishing off and weaving in ends
Before we get to the crochet part there are still a few things to cover. What to do when you get to the end (finishing off)

After this is completed it is now time to do the one thing that every crafter hates….. sewing in the loose ends. It is one of those jobs that we all put off. I have a rule that after every ten ends I stop and
weave them in. That way I am not overwhelmed by the end.

One side will have a squashed flat appearance (wrong side – WS) the other will look crisp, clean and clear (right side – RS). Experiment by looking at both sides and see can you decide which is which?

To weave in the ends, turn to the wrong side.

For me the magic number is three. I repeat this process three times ensuring that my ends are tightly woven and will not come undone.
Enjoying the guide? Why not purchase a copy to keep? click here to purchase the ad free printable guide or consider supporting me via the button below
Now let’s get to the CROCHET!
Learn to make a granny square
Granny squares are versatile. They can make blankets, purses, cushions, headbands, bags, cardigans…. The list is endless. I always tell my learners that if you can master the granny then you can create anything. Below is my tried and tested method for creating a granny square.
Flo’s Granny Square Method
You will need:-
· Some yarn and a corresponding hook e.g. DK and 4mm
· 3 plain or plastic stitch markers
· 1 fancy or silver stitch marker
· Scissors
· Tapestry needle
Round 1

Make a slip knot by whatever method you use (a knot to begin on the end of your hook). Chain, 4 times. Insert your hook into the chain farthest from the hook and pull a loop through (the first chain that you made). This makes a slip stitch and creates a circle which is the centre ring of your granny square. The first round is made working all of your double crochet stitches into the centre of this ring.
Abbreviated version
CH4, SL ST to 1st CH to create a ring
Chain 3 (This chain will act as your first double crochet) In the last chain attach your silver stitch marker. Make 2 more double crochet into the ring. Chain 1 then make 3 more double crochet into the ring. Repeat until you have a total of 4 groups of 3 double crochet all joined with a chain. Slip stitch into the chain space that is marked with the silver stitch marker. Remove marker.
Abbreviated version
CH3, 2 DC, *CH1, 3DC* rep * * 3 times, CH1, SL ST to top of CH3 to close
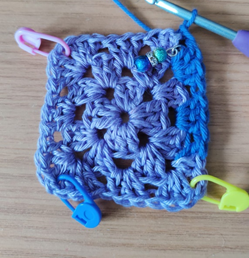
After round 1

Round 2
Chain 3 and insert the silver stitch marker again into the 3rd chain. Place 2 more double crochet into the same space that the chain is coming out from. Moving over to the next large hole we are going to create a corner.
Place 3 double crochets, chain1, and 3 more double crochets all into that one space. When complete add a plastic stitch marker into the chain one space to easily mark the corner.
Repeat this for all of the corners until the last. When you come to the last corner you must place 3 more doubles into the space first worked at the beginning of the row. Chain 1, slip stitch to top of chain 3 (silver)

When you come to the last corner think of a cantilever bridge that opens to let ships pass. The first half of our bridge was already created in the very beginning of the row. The 2nd half of the bridge will now be created at the end of the row. Each half of the bridge is 3 double crochets and they are joined with a chain 1 and a slip stitch into the top of chain 3 (silver stitch marker)

Abbreviated version
CH3, 2 DC, *(3DC, CH1, 3DC)* rep * * 3 times, (3DC, CH1) SL ST to top of CH3 to close

Round 3
Chain 3 and insert the silver stitch marker again into the 3rd chain. Place 2 more double crochet into the same space that the chain is coming out from. Moving over to the next large hole we are going to place 3 double crochets. Then moving into the 1st corner placing 3 double crochets, chain 1, and 3 more double crochets all into that one space. When complete add a plastic stitch marker into the chain one space to easily mark the corner. Place 3 double crochets again in the centre hole.
Repeat this for all of the sides and corners until the last. 3 double crochets in the same space as the chain and 2 double crochet you began with. Chain 1, slip stitch to top of chain 3 (silver stitch marker)
Abbreviated version
CH3, 2 DC, *3 DC (3 DC, CH1, 3 DC)* rep * * 3 times, 3 DC, (3 DC, CH1) SL ST to top of CH3 to close

This method is used continually to grow your granny square to the size you want. Each round will add another set of 3 doubles to each side of the square but the corners will always remain the same.
Learning to Crochet in straight lines
Learning to keep your edges straight is an advanced beginner skill but I have some tips and tricks that will make life easier for you. And again, it is those trusty stitch markers to the rescue.
For practice I suggest chaining any number and placing a double crochet in each.
· Count how many you have in that first row.
· Write it down.
· Your goal will be to keep that number stitches throughout.
A good start is 12. Don’t forget that you will need to include extra for a turning chain. (We begin in the 4th chain from the hook as the chains create the height needed for our first stitch and are counted as a stitch) A chain of 12 will give us 10 stitches.

Straight edges helped by stitch markers

Turning Chain
When you get to the end of the chains for the first time you need to turn your work around it this it faces the other way and you can work into the new set of stitches you just created. When you do this you need a chain to help. It will count as a stitch. Chain 3 and add your stitch marker into the third chain. This tells you where the last stitch of the row must be placed. Continue now to place a stitch in each stitch across to the end of your work.
Chain 3 turn your work around, place stitch marker in the 3rd chain. The silver stitch marker will show you that you must place a stitch there to end the row.
You should now have 2 stitch markers. Continue to use them at the end of each row to help keep your edges straight.
By counting your stitches at the end of each row and making sure you have your guide stitch markers you will ensure you have beautiful straight edges in no time!

That is the basics covered now we are going to move onto some challenges. Take your time and enjoy the process. No one ever got very far by being perfect the first time. Learning to crochet is a wonderful mindful skill once you get to grips with the basics. Put the effort in and before long you will be absorbed into the wonderful craft that really does improve your mental health and well-being on so many levels.
Let the challenges begin!
Here is a more challenging task that will produce a lovely scarf.
This time I have written the pattern in full terms but I have left space for you to rewrite it in full to help with understanding.
Don’t forget your stitch markers!
Simple Open Scarf

This is a simple mesh scarf, and it is a challenge I set my beginners once they are comfortable with a chain and a double crochet.
The idea is that it is like a ladder, each stitch sits on top of each other likewise with the chains. It is easier for you to see where to place your stitches
I recommend using a light shade or a lighter variegated (colour changing) yarn in order to make your first. Stitches are easier to see in lighter colours, darker colours present a challenge all of their own. Click here for yarn ideas
CH 67
__________________________________________________________________
Row 1: DC in 5th CH from hook (4 skipped CH count as DC, CH 1),
*CH 1, skip next CH, DC in next CH; rep from * across
At the end of this row you will have 33 DC + 32 CH-SP.
Place your silver stitch marker in the 3rd chain out of the chain 4.
__________________________________________________________________
__________________________________________________________________
__________________________________________________________________
__________________________________________________________________
At the end of this row you will have 65 stitches.
Row 2: CH 4 (counts as first DC, CH 1), turn,
* DC in next DC, CH 1; rep from * to beg CH, DC in 3rd CH of beg CH-4.
__________________________________________________________________
__________________________________________________________________
__________________________________________________________________
__________________________________________________________________
Rep Row 2 until you reach the length required. You can then either add tassles or seam together to create a cowl shape.
Crochet Flower
Chain any even number. Minimum of 50

DC in the 4th chain from the hook, CH2, DC in the same stitch. *SK 2, (DC, CH2, DC) all in the next stitch* Repeat * * across to end
CH4, turn, DC in same stitch, CH1, 2DC in same stitch. (2DC, CH1, 2DC) in every CH2 space from previous row.
SL ST into the CH1 space, CH3 (counts as a DC), 7DC all in the CH1 space. In each CH1 space across place 8DC.
Finish off leaving a long tail that will be used to sew the flower shape. Roll into the shape of a flower and sew closed.
___________________________________________________________________________________________________
___________________________________________________________________________________________________
___________________________________________________________________________________________________
___________________________________________________________________________________________________
___________________________________________________________________________________________________
I hope you have enjoyed this beginner guide to crochet. I have a range of patterns that are suitable for beginners who have learned the basic stitches and am always on hard and happy to help anyone who needs a little support with my designs. Why not join my dedicated Facebook group to share off all your wonderful creations. Why not give the page a share to help spread the Flo’s Crafty Crochet word 🙂
Thank you and happy hooking
Fiona
Sharing is caring, lets spread the word
